Here are the workshops/lectures I offer. Click on one of the links below to see more details. If you are interested in having me teach or lecture, please contact me at
helmuth@golden.net Trunk Shows/Lectures:
- "My Journey as a Quiltermaker"
- "Relief Sale Quilts"
Workshops: - Yellow Lady Slipper
- Orchids with Sashiko Border
- Introduction to Sashiko
- Landscape One
- Landscape Two - The Next Step
- Roses
- Sunflower
- Pot with Pansies
- Showy Lady Slipper
- Jack in the Pulpit
- Chinese Lantern
- Hawaiian Block
- Crazy Quilt Block
Lecture / Trunk Show 1. My Journey as a Quiltmaker

Showing a variety of quilts and wall hangings, I will share my journey as a quiltmaker with you. Quilting has meant a great deal to me. Many appliquéd quilts will be featured, as they are my favorite.
2. Relief Sale Quilts 
Many people have heard of Mennonite Relief Sales, but don't know what they are. The annual Relief Sale in New Hamburg, Ontario, features the largest quilt auction in Canada - with 100% of the proceeds donated to worldwide relief efforts. Over the years, I have been inspired by the enthusiasm of the women in my church and my local quilting guild, to coordinate a number of unique group quilts, which were ultimately donated to the Relief Sale. Each one was an adventure!
In this slide show presentation, I talk about my personal experiences with the Ontario Mennonite Relief Sale and the group quilts I have orchestrated.
Hand Appliqué Workshops 3. Yellow Lady Slipper

- Duration: 2 days
- Level: All (some appliqué experience a benefit)
- Project Size: 24"x29" (centre: 14"x20")
This native orchid is a striking project for the student with some prior hand appliqué experience. Teaching a variety of techniques, I will lead you through the construction of the flowers. Fabric selection will be discussed, as colour choice has a huge impact on the success of this project.
 Finally, you will infuse your work with true Japanese flavour by embellishing the border with sashiko. I will provide examples of some of the many sashiko patterns , then teach you how to stitch this design into your own work.
4. Orchids with Sashiko Border 
- Duration: 2 Days
- Level: All (some appliqué experience a benefit)
- Size: 24.5"x29" (centre: 14"x16.5")
Ready for a taste of the exotic? Why not learn to appliqué this elegant orchid arrangement, embellished with sashiko stitches? I will guide you through the different hand appliquéd techniques necessary to create the pot, then fill it with twigs, leaves and orchids. You will finish the arrangement with moss to give the whole a three dimensional  feeling.
 Colour selection is very important in this piece and I will discuss choices that create a dramatic effect.
Finally, you will infuse your work with true Japanese flavour by embellishing the border with sashiko. I will provide examples of some of the many sashiko patterns, then teach you how to stitch this design into your own work.
5. Introduction to Sashiko

- Duration: 1 full day
- Level: All
- Project size: 18" x 18")
Using 4 traditional Japanese designs, we will learn the running stitch used by the Japanese to create beautiful sashiko designs. Sashiko is a beautiful compliment to traditional quilting!  The four 6" blocks created in the workshop can be combined into an 18" pillow or small wall-hanging, as shown in the workshop sample, above. Alte
 rnatively, at right, I've created a sample showing how blocks can be interspersed with squares of Japanese prints.
There are so many ways to use sashiko in your projects: let this workshop inspire you!
6. Landscape One - Basic 
- Duration: 1 full day
- Level: All levels
- Project size: 5.5" x 4.5"
We will start with a very simple landscape, using the pattern shown at left. Fabric selection is important: you will need a variety of colours, shades and prints, but only in small amounts -- so start saving your scraps! You will be amazed what you can do with even the smallest scraps.

The detail photograph shows the same landscape pattern, but embellished with a different style of tree: see how it changes the final result!
Also discussed, fabric selection for season and mood, as well as options for finishing your work.
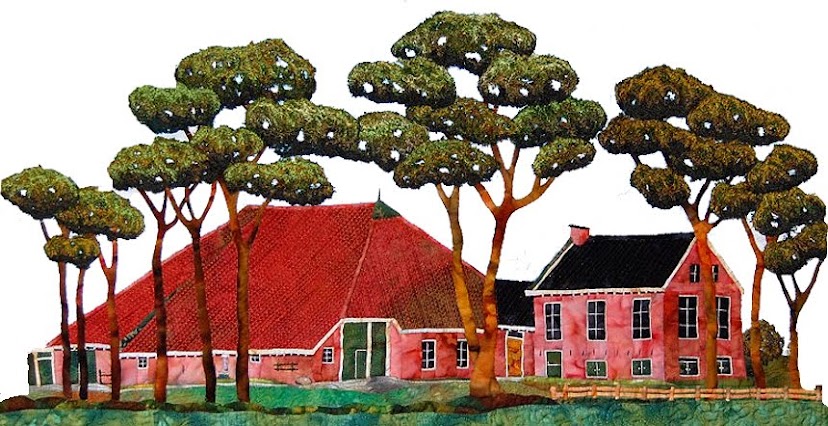
7. Landscape Two - The Next Step

- Duration: 1 full day
- Level: Continuation from Landscape One
- Project size and design: your choice!
This workshop challenges participants to use what they learned in Landscape One to create their own landscape. First, you'll make a pattern from your own picture; then you will start the appliqué on a muslin background. It is strongly recommended that you take the first workshop before participating in this one. The sample shown here is an example of an appliquéd landscape derived from a photograph: imagine the possibilities!
8. Roses 
- Duration: 1 full day
- Level: All levels
- Project size: 21.5"x21.5" (9" circle )
Here's a beautiful project. All the romance of a full-blown rose is captured using dimensional wired ribbon appliqué. I will teach you about the tools and tricks for needle-turn appliqué, as you create the stems and leaves for your rose. Fabric selection is important if you want the variety of shading and colour that gives a realistic result. It is also possible -- though not necessary -- to fussy-cut leaves from a printed fabric, as I have done in the sample shown.
 You will then learn to create the rose "petals" and rose bud. For this, the dimensional wired ribbon gives gorgeous depth, colour and sheen!
We will also discuss ideas and techniques for finishing your project. These roses make a wonderful gift for someone special -- if you can bear to give them away!
9. Sunflower 
- Duration: 1 full day
- Level: All levels
- Project size: 20.5"x 20.5" (9.5" circle)
Like a ring of sunshine, these dimensional wired ribbon sunflowers beckon us with the promise of summer. You’ll learn the basics of needle-turn appliqué as you create the stem and leaves. 
You'll learn how to make a template for your pattern and how to choose fabrics effectively for creating highlights and shadow.
 Next come the sunflowers themselves and you'll be delighted to discover how easily the shaded wired ribbon can be shaped into a ring of petals. So simple -- but such a beautiful result.
The flowers are finished by creating centres filled with coloured seed beads. Finally, you will learn to set your creation into a reverse appliquéd border.
10. Pot with Pansies

- Duration: 1 full day
- Level: All levels, but very suitable for beginners
- Project size: 22"x20.5" (center 10"x9")
Capture the essence of spring with these lovely pansies in dimensional wired ribbon appliqué. And it's easier than you think!
 This is a hand appliqué project that confident beginners can readily take on. I will lead you through the basics of needle-turn appliqué techniques as you create the pot and leaves.
 Next you'll learn to manipulate shaded ribbon into blooms that look almost like the real thing.
Finally, you'll embellish your bouquet with delicate lilies-of-the-valley, made with fabric blooms and embroidered stems.
I will present different options for framing the appliquéd pot of flowers, as well as finishing and quilting your block.
11. Showy Lady Slipper 
- Duration: 1 full day
- Level: All levels
- Project size: 20"x14"
I love orchids, and enjoy capturing their elegant simplicity in appliqué. The Showy Lady Slipper is endangered in the wild, but we can safely capture it in this project with an Art Deco flavour.
We will begin by creating and layering pattern pieces, and I will lead you through the  fundamentals of needle-turn appliqué as you create the stem, leaves and blooms of your flower.
We will discuss the importance of fabric selection for achieving a realistic result.
Ideas and techniques for quilting and finishing will lead you toward a completed project you’ll be eager to display!
12. Jack-in-the-Pulpit

- Duration: 1 full day
- Level: All levels
- Project size: 18"x20" (oval: 8.5"x10.5")
This native bloom is a sure sign that spring has come to the woodlands!
Refine your needle-turn appliqué technique as you create the distinctive striped leaf and tiny spadix inside that gives this plant its name.  We will review pattern layering and discuss fabric colour and selection, for wonderful results.
I will teach you how to frame the oval inset that sets off the piece, and we will discuss tips and techniques for finishing. You’ll be delighted with the result!
13. Chinese Lanterns

- Duration: 1 full day
- Level: All levels
- Project size: 19"x25"
The distinctive lantern shape and bright orange colour of these blooms make them a popular choice in autumn gardens and dried arrangements. Now you can capture these cheerful and festive-looking flowers in appliqué!
Fabric and colour selection is vital to the success of this piece, and we will look at your fabrics and discuss how to make good choices as you build the leaves and blooms from your pattern pieces.
I will lead you through needle-turn appliqué techniques, and will demonstrate the tools and tricks of the trade.
Finally, we will review ideas for finishing and quilting your project.
14. Hawaiian Style Cut-outs

- Duration: 1 full day
- Level: All levels
- Project size: 28"x28"
In Hawaii, the pineapple is a symbol of welcome, and appears commonly as a decorative motif.
The method for creating these cut-out blocks with a Pacific  flair is fun and easy to learn. I will guide you as you move from pattern, through fabric selection, to cut-out, and finally to needle-turn appliqué -- demonstrating the tools and techniques that will give you dramatic results, as in the sample above.
I will also show samples of more complicated patterns that can be created using the very same techniques, as in the photo at right.
We will also discuss ideas for finishing and quilting your project.
15. Crazy Quilt Block

- Duration: 1 full day
- Level: All
- Project size: sample shown is 8.5"x8.5"
Indulge in embellishment! Learn different embroidery stitches, beadwork and ribbon work used for crazy quilting. We will be working on an 8" block, made before  the workshop from a pattern that will be provided.
 This is a chance to use all the "things" you have collected over the years, from old handkerchiefs to buttons and charms to  old laces. There are so many options for embellishing your work, and I will show other samples to inspire you.
We will also discuss ideas for finishing your piece, or incorporating it into other projects.


